
Created : 20 Nov 2019
Last Modified : 05 Mar 2020
***********************************************************************************
Contents:
A. SUMMARY
B. FILE STRUCTURE
C. INSTALLATION INSTRUCTION
D. HOW IT WORKS
E. CONFIGURATION SETTINGS
F. DATABASE TABLES MODIFIED
G. LANGUAGE SETTINGS CHANGED
H. CHANGE LOGS
I. TROUBLESHOOTING
J. FAQ
K. COPYRIGHT NOTICE
L. TERMS AND CONDITIONS
***********************************************************************************
A. SUMMARY
==========
This module
allow your VPCart customers to pay in installments using the AfterPay Service from Australia.
Afterpay divides transactions into four equal installments due every two weeks. Using Afterpay, you can improve the conversion rate, reduce cart abandonment and also increase average order value. Afterpay settles the full amount up-front and assumes any credit and fraud risk.
Afterpay is a free service offered by retailers to shoppers - there are no upfront fees charged nor any interest incurred.
Features:
Our integration currently only supports Australian (AUD) merchants.
To be eligible to use Afterpay, your customers simply need:
- A debit card or credit card.
- To be over 18 years of age.
- An Australian residential address.
This picture below will show you how your customers use Afterpay
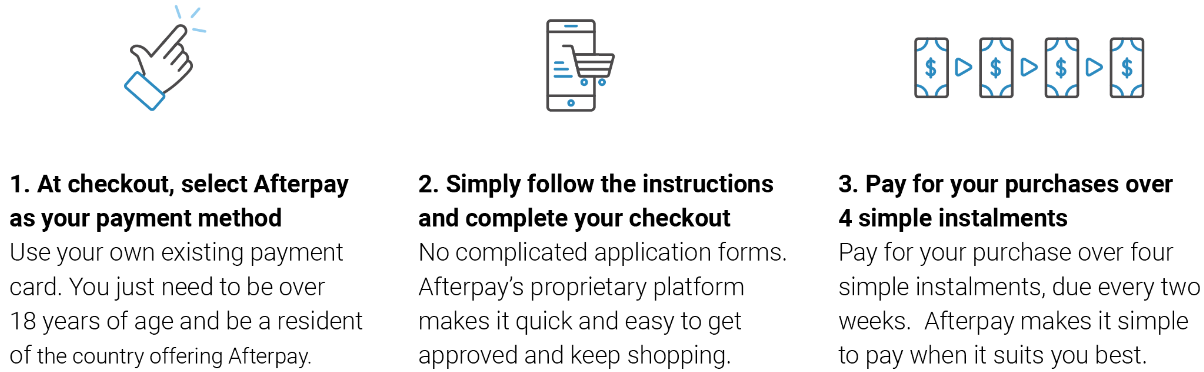
Afterpay can be used for orders up to AUD$1000.
Both normal checkout and one-page checkout method are supported by this module.
To use this module, you must register an account first with AfterPay. The account must be validated by Afterpay.
You can register at https://www.afterpay.com
NOTE:
Since this Afterpay payment module will communicate using application/json, it will need your server to be TLS 1.2 compatible.
Please contact your web host if the server is supporting TLS 1.2. If it is not, then please refer to below help note on how to enable
TLS 1.2 on Windows server:
https://helpnotes.vpcart.com/kb/46-Security-&-Patches/1209-How-To-Enable-TLS-12-On-Windows-Server/
If you have followed the above help note but your server still not compatible for TLS 1.2, you can consider moving to VPCart hosting. You can review our VPCart hosting at:
https://www.vpcart.com/hosting/
***********************************************************************************
B. FILE STRUCTURE
===================
Files included in the zip are:
- $READ_ME_FIRST_afterpay900.HTML
- afterpay_execute.asp
- afterpay_process.asp
- afterpaybase64hash.asp
- afterpayconfig.asp
- afterpaygateway.asp
- afterpayjsonObject.class.asp
-
afterpayresult.asp
-
afterpayshopxmlhttp.asp
- afterpay_images/afterpay_logo.png
- afterpay_images/afterpay-banner-large.png
- afterpay_images/lightbox-afterpay.png
- afterpay_images/lightbox-mobile.png
- plugins/afterpay/lightbox.min.css
- plugins/afterpay/lightbox-plus-jquery.min.js
-
admin/afterpay_setup.asp
-
admin/afterpay_setup_config.asp
-
admin/afterpay_setup_process.asp
-
admin/afterpay_subs.asp
-
admin/afterpayshopxmlhttp.asp
- admin/afterpay_getrefundamt.asp
- admin/afterpay_refundvoid.asp
- admin/js/afterpay/afterpayrefund.js
-
admin/sqlscripts/afterpay/*
***********************************************************************************
C. INSTALLATION INSTRUCTION
============================
1. Upload the below files and folder to your VPCart 9.00 root folder.
- afterpay_execute.asp
- afterpay_process.asp
- afterpaybase64hash.asp
- afterpayconfig.asp
- afterpaygateway.asp
- afterpayjsonObject.class.asp
-
afterpayresult.asp
-
afterpayshopxmlhttp.asp
- afterpay_images/afterpay_logo.png
- afterpay_images/afterpay-banner-large.png
- afterpay_images/lightbox-afterpay.png
- afterpay_images/lightbox-mobile.png
- plugins/afterpay/lightbox.min.css
- plugins/afterpay/lightbox-plus-jquery.min.js
2.
Upload the below files to your ADMIN folder. If you have renamed your ADMIN folder, then this must be placed in the renamed folder.
-
admin/afterpay_setup.asp
-
admin/afterpay_setup_config.asp
-
admin/afterpay_setup_process.asp
-
admin/afterpay_subs.asp
-
admin/afterpayshopxmlhttp.asp
- admin/afterpay_getrefundamt.asp
- admin/afterpay_refundvoid.asp
- admin/js/afterpay/afterpayrefund.js
-
admin/sqlscripts/afterpay/*
3. Log into super admin and execute page below:
http://www.yourdomain.com/<your admin folder>/afterpay_setup.asp
Note: Replace the below with your VPCart site
{ www.yourdomain.com } : your site domain
{ your admin folder } : your admin folder
Click Install Now button.
4. After installation completed, you should see message below:
_______________________________________________________
The Afterpay Direct Payment solution initial setup has now been completed.
Please go to modules configuration page for further setup.
_______________________________________________________
5. Please click the "modules configuration page" link to setup.
- Enable? : Set to Yes to enable Afterpay Payment gateway.
- AfterPay Test Mode? : Set Yes For sandbox/test mode. Set No for production/live mode.
- Merchant ID : Please enter your Afterpay Merchant ID provided by Afterpay representative.
- Merchant Key : Please enter your Afterpay Merchant Key provided by Afterpay representative.
- Enter 3 digit of currency format : Default is AUD.
6. Click Save button.
NOTE: For step 7 until step 14 only required if you are using VPCart 9 release date 2020.02.20.01 and below.
7. Download and open the file admin$common.asp located in your ADMIN folder.
8. Locate below line, estimate line 139,
sub disable_all_gateways
9. Below that code, please insert :exit sub
10. Save the file and upload it back to your site.
11. Download and open the file shopcheckout_subs.asp located in your root folder.
12. Locate below sub routine, estimate line 2-34,
sub execute_external_gateways
dim strsql, rs, cnt, addongateway_oneurl, addonmodulename
cnt = 0
strsql = "select addonenableconfig,addongateway_exurl,addonmodulename from addoninfo where addoncategory = 'gateway' order by addoninfoid "
Set rs = Server.CreateObject("ADODB.Recordset")
rs.open strSQL, dbc, adOpenKeyset, adLockReadOnly
do while not rs.eof and cnt <= 0
if lcase(getconfig(rs("addonenableconfig"))) = "yes" then
addongateway_oneurl = rs("addongateway_exurl")
addonmodulename = rs("addonmodulename")
cnt = cnt + 1
end if
rs.movenext
loop
Closerecordset rs
'2019.06.06 - Enhancement: Better handling on numeric variables on checkout process
if csng(cnt) > 0 then
if trim(addongateway_oneurl) <> "" then
'800 - 2015.06.24 - Better normal checkout layout
htmlwrite "<div class=""main-product"">"
on error resume next
server.execute addongateway_oneurl
if err.number <> 0 then
htmlwrite "<span>"& addonmodulename &" "& getlang("langgatewaynotinstalledonsite") &"</span>"
end if
on error goto 0
'800 - 2015.06.24 - Better normal checkout layout
htmlwrite "</div>"
end if
end if
end sub
sub execute_external_gateways
dim strsql, rs, cnt, addongateway_oneurl, addonmodulename
cnt = 0
strsql = "select addonenableconfig,addongateway_exurl,addonmodulename from addoninfo where addoncategory = 'gateway' order by addoninfoid "
Set rs = Server.CreateObject("ADODB.Recordset")
rs.open strSQL, dbc, adOpenKeyset, adLockReadOnly
'do while not rs.eof and cnt <= 0
do while not rs.eof
if lcase(getconfig(rs("addonenableconfig"))) = "yes" then
addongateway_oneurl = rs("addongateway_exurl")
addonmodulename = rs("addonmodulename")
if trim(addongateway_oneurl) <> "" then
'800 - 2015.06.24 - Better normal checkout layout
htmlwrite "<div class=""main-product"">"
on error resume next
server.execute addongateway_oneurl
if err.number <> 0 then
htmlwrite "<span>"& addonmodulename &" "& getlang("langgatewaynotinstalledonsite") &"</span>"
end if
on error goto 0
'800 - 2015.06.24 - Better normal checkout layout
htmlwrite "</div>"
end if
cnt = cnt + 1
end if
rs.movenext
loop
Closerecordset rs
'2019.06.06 - Enhancement: Better handling on numeric variables on checkout process
if csng(cnt) > 0 then
end if
end sub
14. Save the file and upload it back to your site.
15. Download and open the file shoponepagecheckout.asp located in your root folder.
16. Locate below line, estimate line 14,
<!-- #include file="shopafflog.asp" -->
17. Below that code, please insert :<!-- #include file="afterpayconfig.asp"-->
18. Locate below line, estimate line 80,
display_onepage_main
19. Below that code, please insert :%>
<script src="<%=js_redirection_url%>" async></script>
<script>
function call_afterpay(customercountry, returnedordertoken){
AfterPay.initialize({countryCode: customercountry});
AfterPay.redirect({token: returnedordertoken});
}
</script>
<%
20. Save the file and upload it back to your site.
21. Download and open the file shopfileio.asp located in your root folder.
22. Locate below line, estimate line 1351-1361,
case "FORMATRETAIL"
if not get_pricehide then
'2019.10.29 - Enhancement: Hide retail price if product has quantity variant
if lcase(parsers("spdisplaytype")) = "quantity" then
value = ""
else
value = ShopFormatCurrencyRetail(value,GetConfig("xdecimalpoint"))
end if
else
value = ""
end if
'Afterpay
case "FORMATAFTERPAY4PAYMENTS"
if not get_pricehide then
value = HandleCustomerPrice(value, parsearray, parseRS)
dim strtotcartamount
strtotcartamount = value
if strtotcartamount <> "" and strtotcartamount <> "0" then
strtotcartamount = strtotcartamount / 4
strtotcartamount = ShopFormatCurrency(strtotcartamount,GetConfig("xdecimalpoint")) %>
<link rel="stylesheet" href="plugins/afterpay/lightbox.min.css">
<script src="plugins/afterpay/lightbox-plus-jquery.min.js"></script>
<div id='popupafterpay'>
or 4 payments of <strong><%=strtotcartamount%></strong> with <img src='afterpay_images/afterpay_logo.png' height='15'><a href='afterpay_images/lightbox-afterpay.png' data-lightbox='afterpayinfo'>LEARN MORE</a>
</div>
<%
value = ""
end if
else
value = ""
end if
24. Save the file and upload it back to your site.
25. Download and open the file tmp_product.htm located in your "templates/default" folder.
26. Locate below line, estimate line 23,
$ <span id="parentprice" class="productinfodetails fontbold">[FORMATCUSTOMERPRICE cprice]</span>
27. Below that code, please insert :$ <span id="parentprice" class="productinfodetails fontbold">[FORMATAFTERPAY4PAYMENTS cprice]</span>
28. Save the file and upload it back to your site.
29. Download and open the file responsive.js located in your "plugins/responsive" folder.
30. Locate below line, estimate line 933,
$('[name="'+thisobject+'"]').val('').val(oricartqty);
31. Below that code, please insert :subtotal = parseInt($(response).find('.cart-subtotal').attr('data-value'))
if( subtotal <= 1000 ){
$('#popupafterpay').html($(response).find('#popupafterpay').html())
} else {
$('#popupafterpay').html('')
}
32. Save the file and upload it back to your site.
33. Download and open the file shop_load_othercss_subs.asp located in your root folder.
34. At the very bottom of file before "%>", please insert:
'afterpay
sub load_afterpay_hover_4payments
%>
<link rel="stylesheet" href="plugins/afterpay/lightbox.min.css">
<script src="plugins/afterpay/lightbox-plus-jquery.min.js"></script>
<%
dim strtotcartamount
dim xxdecimalpoint
xxdecimalpoint = GetConfig("xdecimalpoint")
strtotcartamount = getsess("OrderTotal")
if strtotcartamount <> "" and strtotcartamount <> "0" then
' 13 nov 2019 - SAT - check max limit
if strtotcartamount <= 1000 then
strtotcartamount = strtotcartamount / 4
strtotcartamount = ShopFormatCurrency(strtotcartamount,xxdecimalpoint)
%>
<div id="popupafterpay">
or 4 payments of <strong><%=strtotcartamount%></strong> with <img src="afterpay_images/afterpay_logo.png" height="20"><a href="afterpay_images/lightbox-afterpay.png" data-lightbox="afterpayinfo">LEARN MORE</a>
</div>
<%
else
%><div id="popupafterpay"></div><%
end if
end if
end sub
35. Save the file and upload it back to your site.
36. Download and open the file shopcartformat.asp located in your root folder.
37. Locate below line, estimate line 670,
HtmlWrite "<div class='col-xs-5 text-right cart-subtotal'>" & newtotal & "</div>"
38. Below that code, please insert : HtmlWrite "<br/><br/><div style='text-align:right;'>"
load_afterpay_hover_4payments
htmlwrite "</div>"
39. Save the file and upload it back to your site.
40. Download and open the file shopcartformatdesign.asp located in your root folder.
41. Locate below line, estimate line 105,
CartResponseWrite "<span class=""cart-subtotal spanblock"">"
42. Please REPLACE with below code:CartResponseWrite "<span class=""cart-subtotal spanblock"" data-value="""&cartisubtotal&""">"
43. Save the file and upload it back to your site.
44. You are done.
***********************************************************************************
D. HOW IT WORKS
===============
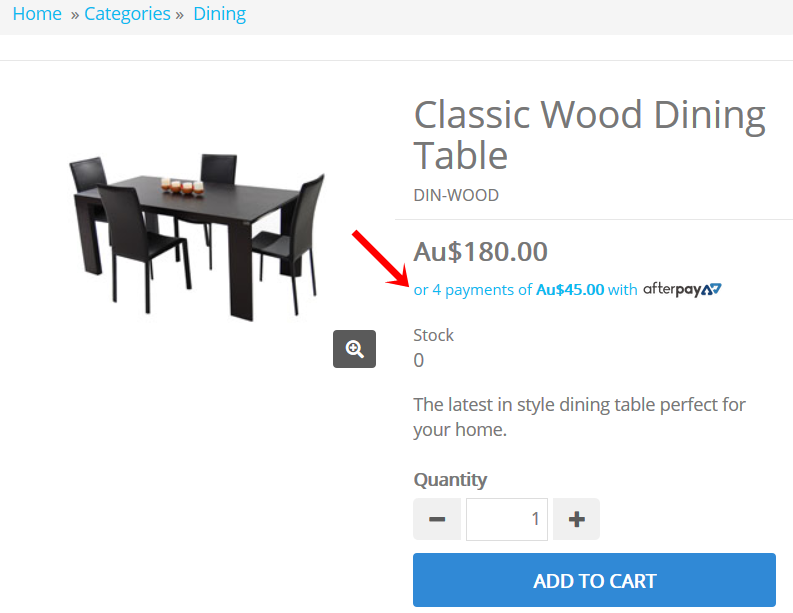
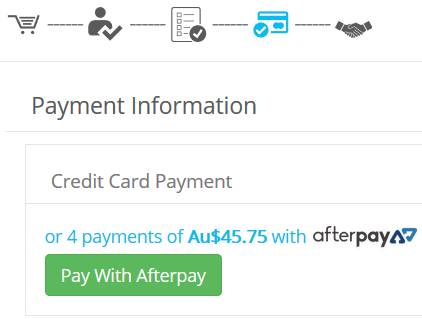
After you have installed Afterpay payment gateway module, the product details page will show the Afterpay payment info like screenshot below:
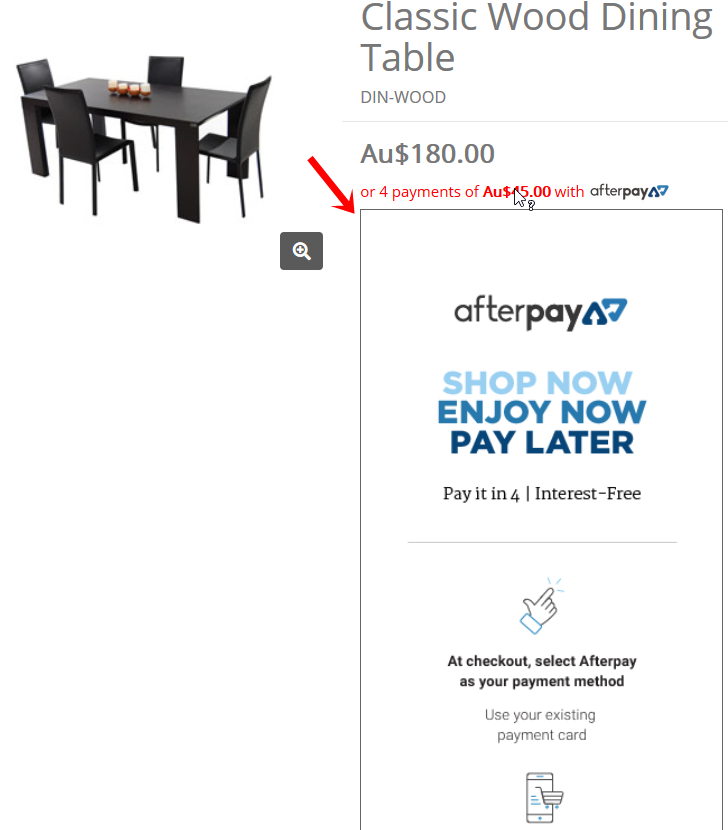
When customers mouse over the payment info, they will see the pop up details on how to pay and the requirements like screenshot below:
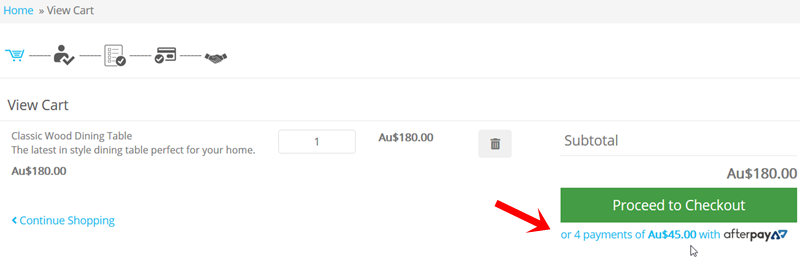
The same when customers are landed at the cart page, the Afterpay payment info is showing. Please see the screenshot below:
When customers do a checkout, they will see a button "Pay with Afterpay" on the checkout page.
They click the button and will be taken to Afterpay hosted site to make the first payment from allocated 4 payments. Once the first payment is made, customers will be returned back to the merchant site.
On a success payment, Afterpay will return response with Payment ID and Status to your VPCart site.
VPCart will update the following Orders table fields as below eg :
ocardtype : AfterPay
oauthorization : Payment ID=xxxxxxxx Status=APPROVED
oafterpayordertoken (new field) : 1l9cbvh3e2gom7j36tib2glha4tprj2ck574g948vjat1xxxxxxxx
If no Payment ID and Status returned in the response from Afterpay is FAILURE or CANCELLED, then it will be marked as declined/failed payment.
VPCart will update the following Orders table field as below eg :
ocardtype : AfterPay-Cancelled
And redirect customers back to shopcheckout.asp.asp to retry their payment.
NOTE: Afterpay payment is supporting Sandbox mode. You can use your Sandbox account to test before going live.
Afterpay Refund process
You can do refunds for any online purchases paid using Afterpay directly from within the VPCart orders administration.
Go to : Store > Orders and locate the column "Payment Status". For any success payment, you can see a link for Refund.

To do a refund for an order, click the Refund link.
It will then take you to the Refund form as shown on screenshot below:
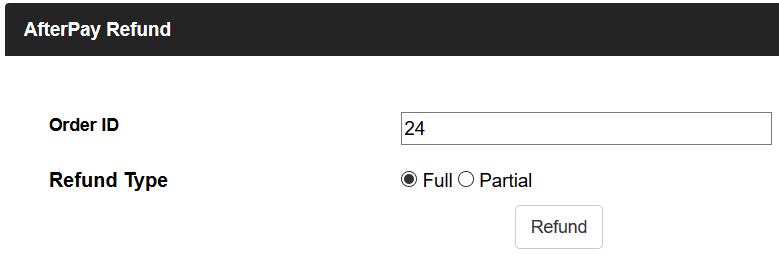
There are two Refund type you can choose:
1) Full refund.
If you choose Full refund, it will send the full order amount to Afterpay for the refund.
Example, if the total order amount is $50 then Full refund process will send the total $50 refund request to Afterpay.
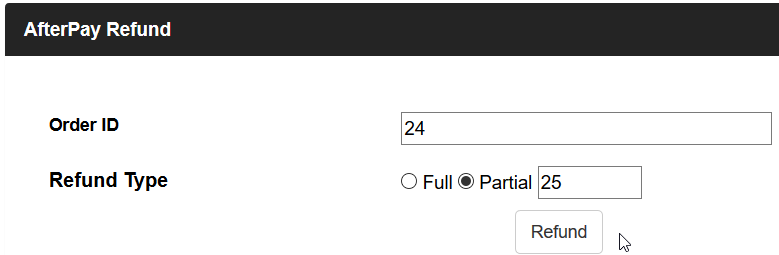
2) Partial refund.
It's flexible that you can do partial refund to your customers more than once on your liking.
For example, a total order amount is $50, and you wish to do refund in partial eg
First refund $25
Second refund $25
The Partial refund can handle this for you.
Simply choose the Partial option, and you will see the amount textbox. Enter eg 25 into it and click Refund to proceed.
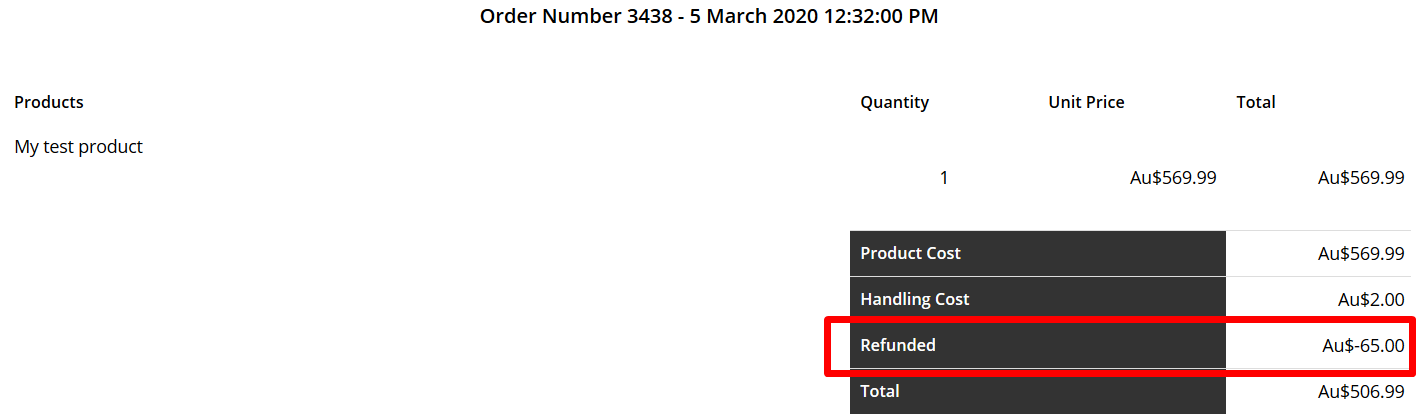
For a success refund, the following Orders table fields will be updated:
- oauthorization : Added the Date and time of the refund, Refund ID, refunded amount and the full/partial refunded status eg
Date=2020-03-05T02:49:31.912Z
Refund Trans ID: 81608 : Au$25.00
Partially refunded
NOTE : If you do more than one refund for an order, then it can be tracked from this
oauthorization value eg:
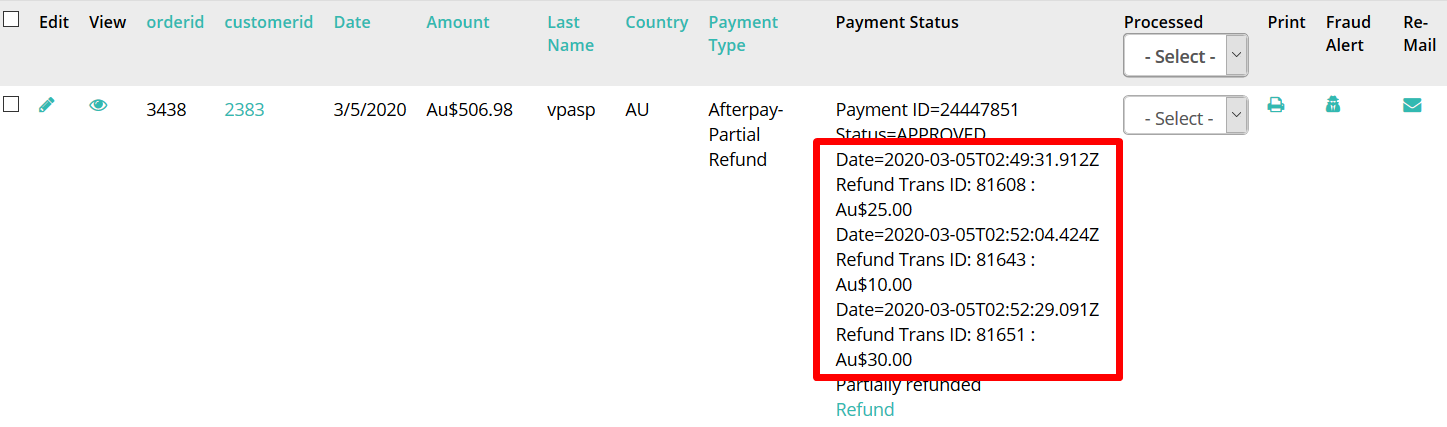
The example above showing that first refund AUD$25.00 is made and then followed by second refund AUD$10.00 and then 3rd refund AUD$30.00.
The following fields in Orders table are used for refund process:
- oafterpayrefundid (new field) : The latest refund id made for the order
- oafterpayrefunddatetime (new field) : The last refund process date and time.
- oauthorization : All the refund date, refund id and refund amount in each refund request will be appended to the existing payment status.
For any successful refund, VPCart will deduct the refunded amount to the total order amount (orderamount field).
Also,
in your order details page in administration, merchants able to see the total of refunded amount.
***********************************************************************************
E. CONFIGURATION SETTINGS
=================
New configs:
- xafterpay_enable
- xafterpay_merchantid
- xafterpay_merchantkey
- xafterpay_testmode
- xafterpay_currency
F. DATABASE TABLES MODIFIED
===========================
Orders table, new fields:
- oafterpayordertoken text 100
- oafterpayrefundid text 100
- oafterpayrefunddatetime text 50
Orders table, existing field size changed:
-
oauthorization field size increased to text 4000
G. LANGUAGE SETTINGS CHANGED
============================
New language keywords added:
- langafterpayrefundcolumntitle : AfterPay Refund
- langafterpaytotalorderexceedlimit : Your total order exceeds max allowed amount by AfterPay.<BR>You are only allowed to purchase with total order amount until AUD$
-
langafterpayrefundamounterrormsg : Refund amount should not exceed order amount.
-
langafterpayrefundamountinvalid : Invalid refund amount.
-
langafterpayrefund : Refund
H. CHANGE LOGS
============================
NONE
***********************************************************************************
I. TROUBLESHOOTING
============================
Please submit a ticket to our helpdesk at https://helpdesk.vpcart.com and our support team will assist you.
***********************************************************************************
J. FAQ
============================
NONE
***********************************************************************************
K. COPYRIGHT NOTICE
============================
Copyright (c) 1999-2023 Rocksalt International Pty. Ltd.
All rights reserved.
This software and documentation constitute a published work and
contains valuable trade secrets and proprietary information
belonging to Rocksalt International Pty. Ltd. .
None of the foregoing material may be copied,
duplicated or disclosed without the express written permission
of Rocksalt International Pty. Ltd. .
LICENSEE ACCEPTS VP-ASP Shopping Cart "AS IS" "WITH ALL FAULTS",
Rocksalt International Pty. Ltd. accepts no responsibility for the
operation or performance of the VP-ASP Shopping Cart.
The entire risk of use and consequences of use of the
VP-ASP Shopping Cart falls completely on the Licensee
and Rocksalt International Pty. Ltd. shall not be liable in any respect
for any claims, loss or injury alleged to have resulted
from use of or in reliance on VP-ASP Shopping Cart.
Licensee acknowledges that it has read the foregoing
disclaimers of warranty and limitation of liability
and understands that Licensee assumes
the entire risk of using VP-ASP Shopping Cart.
***********************************************************************************
L. TERMS AND CONDITIONS
============================
ROCKSALT INTERNATIONAL GRANTS TO THE LICENSEE A NON-EXCLUSIVE,
NON-SUB LICENSABLE, NONTRANSFERABLE LICENSE
TO INSTALL AND USE THIS APPLICATION ON A SINGLE DOMAIN FOR
A SINGLE SHOP.
THE CODE IN THE APPLICATION MAY BE MODIFIED FOR USE IN
SETTING UP A SINGLE SHOPPING SITE ON THE WORLD WIDE WEB.
LICENSEE MAY MAKE A COPY OF THE APPLICATION FOR
BACK-UP AND ARCHIVAL PURPOSES, PROVIDED THAT ANY COPY
MUST CONTAIN ALL PROPRIETARY NOTICES INCLUDED
WITH THE APPLICATION.
LICENSEE IS PROHIBITED FROM SELLING OR DISTRIBUTING
THE APPLICATION IN ANY MANNER.
LIMITATION OF LIABILITY.
ROCKSALT INTERNATIONAL AND ITS LICENSORS SHALL
NOT BE LIABLE FOR ANY DAMAGES SUFFERED BY LICENSEE OR ANY
THIRD PARTY AS A RESULT OF USING OR DISTRIBUTING THIS
APPLICATION.
IN NO EVENT WILL ROCKSALT INTERNATIONAL OR ITS LICENSORS
BE LIABLE FOR ANY LOST REVENUE, PROFIT OR DATA,
OR FOR DIRECT, INDIRECT, SPECIAL,
CONSEQUENTIAL, INCIDENTAL OR PUNITIVE DAMAGES,
HOWEVER CAUSED AND REGARDLESS OF THE THEORY OF LI
ARISING OUT OF THE USE OF OR INABILITY TO USE THE SOFTWARE,
EVEN IF ROCKSALT INTERNATIONAL HAS BEEN ADVISED OF THE
POSSIBILITY OF SUCH DAMAGES.